Whether you’re capturing a quick voice memo, recording a podcast episode, or documenting an interview, your iPhone is a versatile tool for all your audio recording needs. With a few taps, you can record, edit, and share high-quality audio files. This article will guide you through the process of iPhone Audio Recording, making you a pro in no time.
Table of Contents
Step-by-Step Guide to iPhone Audio Recording
- Locate the Voice Memos App: The Voice Memos app is a built-in feature on all iPhones. It’s a simple, user-friendly app that lets you record audio directly onto your device. You can usually find it in the ‘Utilities’ folder.
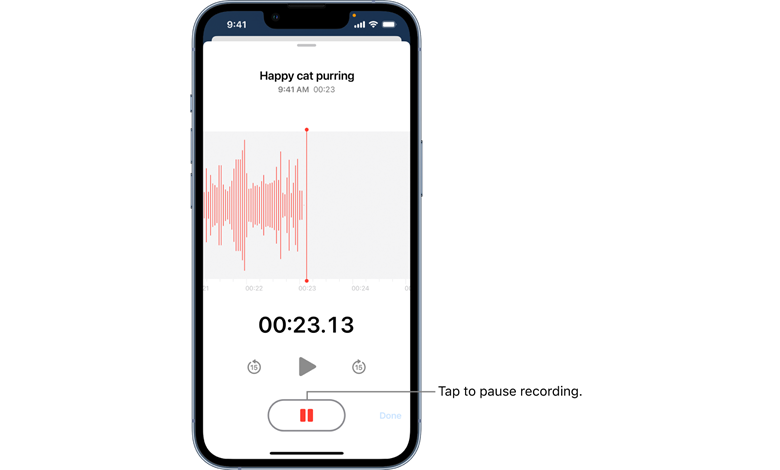
- Start Recording: Open the Voice Memos app and hit the red record button. Your iPhone will start recording the audio immediately. Speak clearly and ensure there’s minimal background noise to get the best sound quality.
- Pause or Stop: The recording can be paused at any time by hitting the pause button, and resumed by pressing the record button again. Once done, tap the stop button to end the recording.
- Save Your Recording: After stopping the recording, you can review it by pressing the play button. If you’re happy with it, save it by clicking ‘Done’. You’ll be prompted to give it a name – choose something descriptive so you can easily find it later.
- Edit Your Recording: The Voice Memos app also offers basic editing features. You can trim, replace, or delete parts of your recording, adjust the speed, and enhance the sound quality.
- Share Your Recording: To share your recording, simply click on the share button and choose the desired method – message, email, AirDrop, or even directly to social media.
Pro Tips for iPhone Audio Recording
To make the most of your iPhone’s recording capabilities, here are a few tips:
- Use a Microphone: For professional-grade audio, consider using an external microphone that plugs into your iPhone. This will significantly improve sound quality.
- Find a Quiet Place: Background noise can interfere with your recording. Find a quiet, echo-free room to ensure your audio is clear.
- Use a Pop Filter: If you’re recording speech, a pop filter can help reduce unwanted noise from plosive sounds (like ‘p’ and ‘b’).
- Try Third-Party Apps: There are several apps available on the App Store that offer advanced features for audio recording and editing, such as GarageBand, RØDE Reporter, and Recorder Plus.
FAQs
Q: Can I record audio in the background on my iPhone? A: Yes, the Voice Memos app will continue to record even when the app is minimized or the screen is locked.
Q: Can I improve the quality of my audio recordings? A: Yes, using an external microphone and recording in a quiet, echo-free room can significantly improve the quality of your recordings.
Q: Are there other apps I can use for audio recording on iPhone? A: Absolutely, there are numerous third-party apps available for more complex audio recording and editing needs, such as GarageBand, RØDE Reporter, and Recorder Plus.
Conclusion
With your iPhone at your side, high-quality audio recording is within your reach. Whether you’re a budding musician, a dedicated podcaster, or simply someone who wants to record their thoughts, the process is straightforward and easily accessible. Remember, the key to a great recording is not just the device but also the environment and equipment you use. So, find a quiet space, consider investing in a good-quality external microphone, and explore the plethora of apps available to you.
Remember, the goal of iPhone Audio Recording is not just to capture sound but to create a listening experience. Whether it’s for a podcast or personal memo, it’s all about creating something that’s a pleasure to listen to. Let your iPhone be your gateway to fantastic audio content. Happy recording!


